Welcome to the Atlas Zipper Case Sew Along Day 5!
Today we’re finishing up our Atlas Zipper Cases by first installing the zipper, then adding the bias binding and zipper tab.

The biggest tip I have for today is to SEW SLOWLY! I know it gets exciting to be at the end and wanting to quickly finish, but I’ve found that when I try to rush through these last couple steps, I end up using the seam ripper more than I want. Haha!
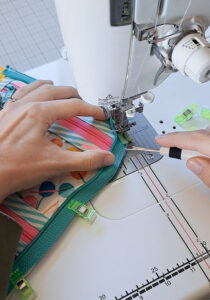
When installing the zipper around the curves of the Zipper Case, I really take my time–stopping the needle every two to three stitches to lift the presser foot, rotate the Case, and adjust the zipper to make sure it’s not folded over anywhere. Since you don’t want your finger too close to the needle, you can use a seam ripper or tool called a stiletto (By Annie makes a great one!) to reach in by the needle and hold the zipper in place as you slowly sew everything in to place.
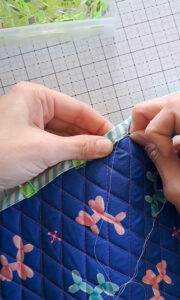
When sewing both the zipper and bias binding, I tend to have a hard time keeping a consistent seam allowance. Part of this is due to the thickness of the Zipper Case fluctuating as you sew over the pockets, binding, and zippers. After attaching the first side of the bias binding, I always go back through and see how my seam allowance is looking. Is it really small in some areas? If so, I go back through and do another stitch line in that area to get it closer to 1/4″. Is it too big in some areas? If so, I either unpick to resew at a 1/4″ seam allowance, or I trim the bulk in the seam allowance so the binding can get up and around the raw edge. Keeping a consistent 1/4″ seam allowance will help the bias binding look more uniform on both the inside and outside of the Zipper Case.
If you’re finishing the bias binding off by machine, frequently check to make sure that the zipper is always pointing in toward the center of the Zipper Case and out of the way of the needle. It has a tendency to fold back on itself and get in the way of the needle, especially around the corners! If the zipper does get folded under the needle, you’ll need to unpick that section and resew to make sure the zipper is fully functional.
Even with the experience that I have, I am still not always in love with how my bias binding looks when finishing it by machine, so I’ll frequently hand bind it instead. It takes a bit longer, but I’m always so much happier with the end result.
Those are my tips for Day 5! Thanks so much for joining me in the Atlas Zipper Case Sew Along! The Sew Along blog posts and videos on my Instagram account will stay put, so you can refer to them whenever you want. If you share any photos of your Atlas Zipper Case on Instagram, please tag me, as I’d love to see your Case!
Links for products from today’s assignment:
By Annie Stiletto Tool (click HERE)
By Annie Zippers by the Yard (click HERE)
Juki TL2000 Sewing Machine (click HERE)
Thanks for sewing along!
Kristina
Kris Simpson says:
I can’t really tell how you stitched at the bottom of the zipper. Do you just stop a half inch from the center like you did at the start of attaching the zipper?
centerstreetquilts says:
I angle the zipper up and away from the bottom side of the pouch, then backstitch as I sew off the edge of the zipper.
Mindy says:
Hey there, Kristina! For Christmas I whipped up three of the Atlas Zipper Cases for my three “grands!” The Pikachu, Spiderman, and Hello Kitty cases were all hits, especially as they were perfect for stashing the Christmas stocking stuffers from “Mimi’s” house.
The two little boys appeared at my house one morning, each carefully carrying a handful of very special Lego’s with them. They wanted to make sure that they had them to use with Mimi’s special Legos! That’s when I realized that the Atlas case would be perfect for Lego people!
Now that I have a new “grandbaby girl” born south of you in Anchorage, it’s going to be time to start sewing up cases for her! I’ve already made some of your bags from my son and daughter-in-law there at Elmendorf AFB.
As a piano teacher, sometimes I need a little gift for a student, and whipping up a bag means that the gift will not end up in a landfill, as the toys frequently do. Plus, I know that one child was more interested in the chocolate in the bag– than the bag itself–I could see that her mom was ready to grab up the bag for her own use!
Thank you for your lovely projects which are clearly illustrated, giving me all the more encouragement to take on zippers! Mindy
centerstreetquilts says:
Hi Mindy,
Thanks so much for taking the time to comment! I’m so glad that the Atlas Zipper Cases were a hit with your grandkids!
Lori says:
I enjoyed the sew along for this case. I added a handle and a removable strap and turned it into a purse. I love it.
centerstreetquilts says:
Hi Lori,
That’s a great idea!
Scarlett Robinson says:
I just finished my third Atlas. One of them I printed on cloth on my printer. A friend had written a couple of books and I used a copy of the front covers on the front and back. She was very touched and thanful.I will probably be maing more, maybe even teach a class at quilting guild. Great pattern.
centerstreetquilts says:
Hi Scarlett,
What a wonderful and thoughtful idea! I’m sure it will be a well-loved gift.